|
|
|
Cut & Cobble Foam Insulation in Old House
Last Post 12 Feb 2014 03:23 PM by Dana1. 11 Replies. |
Sort:
|
|
 Prev Next Prev Next |
You are not authorized to post a reply. |
|
dragon73

New Member

Posts:6
 |
| 24 Jan 2014 12:51 AM |
|
I am going to be installing foam insulation in my walls and ceiling using the cut and cobble method. The foam boards are recycled polyisocyanurate and are 3" thick with some kind of black paper on both sides. I have removed the exterior siding and the inside is gutted down to the studs. This house was built around 1900 and most of the wood is in great shape. Much of the pine sheathing is around 18" - 24" wide! I think it has been well preserved because the house could breath as there was no insulation in the walls. I just want to make sure that I am not creating any problems within the walls. I am in upstate New York and and will be heating with primarily wood supplemented with electric in the farthest corners of the house. Also, I will be installing an air-to-air exchanger to make sure there is plenty of fresh air in the house. Here is my plan for the walls going from interior to exterior:
1) Drywall
2) Plastic vapor barrier
3) Rigid foam board tightly fitted between studs (true 4" studs) and caulked
4) 1" air gap between foam boards and exterior sheathing
5) Original pine plank sheathing
6) 30# roofing felt
7) Air gap for rain screen
8) Reverse board and batten siding - painted all 6 sides
For the ceiling, it would be:
1) Drywall
2) Plastic Vapor Barrier
3) 4" air gap
3) Two layers of rigid foam tightly fit between attic floor joists (true 2 x 10 joists) and caulked
4) 1" x 6" rough sawn pine for flooring in unconditioned attic space
I have read a lot on this forum and understand that there will be thermal bridging and that this may not be the absolute best way to insulate, but I like it because it is inexpensive, simple (though time consuming), and I already have the foam boards. People have lived in this house for over a hundred years without insulation so I figure any insulation installed properly is an upgrade. After reading the Martin PDF, I really like the 30# roofing felt over the sheathing.
I suppose the things I am questioning are the vapor barrier under the drywall, the caulk around the foam, and the air gap between the foam and sheathing. Does it make sense to have the plastic vapor barrier or not? Do I really need to caulk around the foam in the walls if I get a tight fit? Seems to me there would not be very much air movement between the vapor barrier and the roofing felt. Should I leave the 1" gap between the foam and sheathing or between the foam and vapor barrier/drywall. Or maybe I should split it evenly between the two and leave 1/2" on either side? Thanks in advance. |
|
|
|
|
|
|
Bob I

Veteran Member
Posts:1435
|
| 24 Jan 2014 06:40 AM |
|
you would be well advised to put the foam over the sheathing so the studs stay warm, and insulate in the bays with something else. But if you're determined not to do that, maximize your insulation and do not create more problems. One of the major issues is moisture in the walls. You'll have an impermeable wall, so you must eliminate the poly so the wall can dry outwards or inwards if/when moisture gets in.
1: eliminate the poly
2: yes, you do need to caulk around the foam - use a long lasting caulk like DAP35 or Sherwin Williams urethane. Air bypassing your insulation will decrease the value of the insulation.
3: put the foam against the sheathing; Fill the interior air gap with some type of insulation. You must have some wiring in the wall, so and run the wires on the inside of the foam
4: rethink this and reconsider installing the foam on the exterior.
Wood moves. It shrinks and expands with changes in temperature and humidity, and when the house moves in hight winds. The gaps between the foam and the studs and between the foam and the ceiling joists will (not might, but will) open up over time and bring air movement and moisture into your wall and ceiiling assembly. you can plan for this, or fight it for years. |
|
| Bob Irving<br>RH Irving Homebuilders<br>Certified Passive House Consultant |
|
|
Bob I
Veteran Member
Posts:1435
|
| 24 Jan 2014 07:59 AM |
|
One other issue: the most important insulation consideration is getting the house tight. that is as important as the insulation, as I found out in my "1980 superinsulated" house which didn't work well until I figured it out and started dealing with it. cobbling insulation between studs and ceiliing joists is very very difficult to air seal; putting foam on top/outside makes air sealing a cinch. |
|
| Bob Irving<br>RH Irving Homebuilders<br>Certified Passive House Consultant |
|
|
arkie6
Veteran Member
Posts:1453
|
| 24 Jan 2014 02:32 PM |
|
Rather than cutting the foam to try to fit tight in the walls, cut it ~1/4" short all the way around so that you can foam it in place with spray foam such as one-part Great Stuff in the can. At $2.64 per can at the local Wal-Mart, it is hard to beat this stuff for air sealing. |
|
|
|
|
Dana1

Senior Member
Posts:6991
|
| 24 Jan 2014 05:29 PM |
|
First, with cut'n' cobbled foam in the stud bays, installing a poly vapor barrier is more likely to CAUSE a moisture problem than solve one. The asphalted paper facers on polyiso are class-II vapor retarders, which are PLENTY of protection for the plank sheathing, and with interior poly you would only slow down the drying rates of any moisture that DID find it's way into the stud bays.
Worse yet, #30 felt on the exterior of the sheathing is damned near class-I vapor retardency. Make that #15 felt, skip the poly and you'll have a fighting chance of having the assembly run for another hundred years with out serious rot issues.
With a rainscreen gap between the plank sheathing and board & batten there's no advantage to the 1" gap between the sheathing and foam. Splitting an R11 batt and compressing it in there would deliver another ~R4 of nominal R value. But it'll actually deliver better than that, since it will raise the average temp of the polyiso. While roofing iso has a fully depleted R of about 5.6-5./inch @ 75F center-foam temp, it rises to over R6 at a center-foam temp of about 50F, but then takes a pretty serious performance hit when the average foam-temp drops below 40F. At 0F outdoor temps that outer inch of iso might only be delivering R2, but with R4 of fiberglass you'd push off that performance hit considerably, improving the cold-temperature performance of the polyiso, gaining far more than the mere R4 of the fiberglass.
Rather than can-foam, when you have a lot of seam to seal you're better off with a 12 board foot FrothPak kit (about $40 at box stores), which is a 2-part 1.75lb density closed cell polyurethane.
If you take Bob's very good advice and put the foam on the exterior rather than cut'n'cobble, put a crinkle type housewrap rather than asphalted felt between the foam & sheathing, and detail it as an air-barrier. With the foam on the exterior you can stuff the cavities with compressed unfaced R19s (which will perform at about R16 at a full-dimension 4" depth) and skip any sort of interior side vapor barrier. It's a lot less labor, easier to air seal, and 2x the performance to do it that way. The full-dimension 2x4 studs even in a balloon framed building comprise on the order of 20% or more of the wall surface area, and have an R value of only R5. With the polyiso on the exterior you'll thermally break that R5 with R15-ish average wintertime performance in your location. |
|
|
|
|
dragon73
New Member
Posts:6
|
| 01 Feb 2014 10:05 AM |
|
Thanks for the replies and sorry for the delayed response. Been away with an injury but much better now. I have a few concerns about the foam on the outside.
1) Is there a way to fasten the 3" boards and siding to the sheathing without incurring the high cost of very long screws?
2) The boards are 4x4 and not necessarily perfectly cut. Will having many more seams be a problem?
3) The roof overhang is currently about 8". By adding 4 extra inches (3" insulation & 1" rain screen), will 4" of overhang be enough?
4) I am concerned I will miss the framing and blocking when attaching the siding because I will be screwing through 6" of material before I hit the studs and blocking. Any way to avoid this?
I am willing to entertain putting the foam on the outside, but it just doesn't feel right to me, yet. My goal in putting this house back together is to do it so that it will last and to reduce the long term maintenance. However, I am also doing this on a tight budget because we are not taking out a mortgage or incurring any debt to finish it. It will go much slower, but that is how we want to do it. So that means we only have $500 to $1,000 per month to put into materials. That goes really fast when buying materials new. So if I can put the insulation into the wall and have a system that will work for a long time, that is probably what I would like to do. I figure that people have lived in this house for well over a hundred years without insulation. If I improve that at all, we'll be doing infinitely better. If I had my druthers, this would be an all natural house built with earth bags, straw bales, stone, wood, and earth plaster. I would not even worry about insulation and would be talking about thermal mass instead. But this is the house we have. So super insulated is not necessarily my goal. Functional and low cost are my primary goals. Heck, I have even been tempted to put the walls back together without any insulation and let the house breath for another 100 years but my wife doesn't want to feel like she and the kids are roughing it in our home. |
|
|
|
|
arkie6
Veteran Member
Posts:1453
|
| 01 Feb 2014 11:49 AM |
|
Posted By Dana1 on 24 Jan 2014 05:29 PM
Rather than can-foam, when you have a lot of seam to seal you're better off with a 12 board foot FrothPak kit (about $40 at box stores), which is a 2-part 1.75lb density closed cell polyurethane.
If you are trying to get by on the cheap, Great Stuff 12 oz canned foam is hard to beat if you buy it at Wal-Mart. In your above example, you get 12 board feet of foam which equals 1 cubic foot of foam for $40 or so (the local Lowes has it for $42). A 12 oz can of Great Stuff will yield 259 lineal feet of 3/8" diameter bead per Dow's website. That equates to 343 cubic inches or 0.199 cubic feet of foam per 12 oz can. So, it will take 5 cans of foam to yield 1 cubic foot. At $2.64 per can, the cost for 1 cubic foot of the material is $13.20, or 1/3 the cost of the FrothPak. |
|
|
|
|
Dana1
Senior Member
Posts:6991
|
| 03 Feb 2014 11:24 AM |
|
Posted By dragon73 on 01 Feb 2014 10:05 AM
Thanks for the replies and sorry for the delayed response. Been away with an injury but much better now. I have a few concerns about the foam on the outside.
1) Is there a way to fasten the 3" boards and siding to the sheathing without incurring the high cost of very long screws?
2) The boards are 4x4 and not necessarily perfectly cut. Will having many more seams be a problem?
3) The roof overhang is currently about 8". By adding 4 extra inches (3" insulation & 1" rain screen), will 4" of overhang be enough?
4) I am concerned I will miss the framing and blocking when attaching the siding because I will be screwing through 6" of material before I hit the studs and blocking. Any way to avoid this?
I am willing to entertain putting the foam on the outside, but it just doesn't feel right to me, yet. My goal in putting this house back together is to do it so that it will last and to reduce the long term maintenance. However, I am also doing this on a tight budget because we are not taking out a mortgage or incurring any debt to finish it. It will go much slower, but that is how we want to do it. So that means we only have $500 to $1,000 per month to put into materials. That goes really fast when buying materials new. So if I can put the insulation into the wall and have a system that will work for a long time, that is probably what I would like to do. I figure that people have lived in this house for well over a hundred years without insulation. If I improve that at all, we'll be doing infinitely better. If I had my druthers, this would be an all natural house built with earth bags, straw bales, stone, wood, and earth plaster. I would not even worry about insulation and would be talking about thermal mass instead. But this is the house we have. So super insulated is not necessarily my goal. Functional and low cost are my primary goals. Heck, I have even been tempted to put the walls back together without any insulation and let the house breath for another 100 years but my wife doesn't want to feel like she and the kids are roughing it in our home.
With 3" of foam and 1x strapping and 1x plank sheathing you'll need 6" timber screws, 24" o.c. at about 70 cents per from box-stores, or about 52 cents per if you buy them in bigger boxes online. For a 10' tall wall with studs 16" o.c. you're looking at 34 cents per square foot of wall area for the screws a the higher box-store, 25 cents per square foot at the online prices. With full-dimension studs it's surprisingly easy to get the knack of hitting the studs, especially if you snap chalk likes on the foam corresponding to the sheathing nail heads on which to center the furring. Keep a can of foam handy to fill/seal any misses during the learning curve though. Having more seams isn't a problem- seal the seams with can foam, trim the excess flush. It's common all over New England to see Cape style houses with 4" of less of overhanging eave. With rainscreened siding the importance of eave overhangs diminishes significantly. A drip edge 3" out from the siding would be a luxury for some of them, eg:  (obviously setting the drip edge directly on cedar shingles isn't exactly best-practice.  ) |
|
|
|
|
dragon73
New Member
Posts:6
|
| 05 Feb 2014 01:00 PM |
|
I have been mulling this over and over in my head. There are so many variables that it is hard to really come to an answer for myself. There are some things that I can't quite work out how to do. Here are a few more concerns I have about putting the foam on the outside.
How do I detail around the windows to keep the water out of the space between the foam and the sheathing. Right now, my sill pans drain the the outside of the roofing felt that is over the sheathing. Do I have to pull the windows and make new sill pans to go over the foam. I could probably carefully pull up the bottom edge of the sill pan and then extend it over the foam. However, I used the Vycorners to make the sill pan which are a hard plastic, If I cut those and just rely on the ice and water shield tape, then I think that might cause problems down the road with water potentially getting between the foam and sheathing and the sheathing having no good way to dry out. In my experience, I always expect windows to leak. Maybe I could put some sort of drainage plane behind the foam under all of the windows and get some 2" foam for those areas instead? That sort of defeats the purpose of putting the foam on the outside, though. At least in those areas.
Dana1, I'm not sure on how you are thinking about putting up the siding. By my calculations, the material that I would be screwing through is 5" or 6" depending on whether it is the board or the baton that I am screwing in the siding. If it is the board (this is reverse board and baton), then I would be screwing through 1" of board, 1" of baton, 3" of foam, 1" of sheathing, and then into the studs and blocking. That is 6" before I hit the blocking. I think I would need more like 8" screws. Are you suggesting another method of rain screen using strapping on top of the foam and then screwing the board and baton to the strapping? If so, that would add another 2" to the thickness of my wall pushing the siding out even further (would have to do vertical strapping first with horizontal straps on top of that to keep the continuous air gap). As far as the number of screws per square foot, I calculated 2.16 screws per square foot using 8" boards and 4" batons with a 2" reveal between the boards (again, reverse board and baton). This is with screws every 2' vertically using 1 screw in the middle of the 4" baton and 2 screws in the board towards the center. On a 10' wall, that would be 18 screws per board and baton which comes out to be 2.16 screws per square foot. The cheapest I found 8" timber screws was on Amazon. A box of 250 TimberLok 8" screws was $129.50. That's 51.8 cents per screw. So the price per square foot for the screws is $1.12. I have about 2,400 square feet of siding to do which comes out to be 21 boxes of screws or $2,719.50. This is a lot of extra cash to me and it adds up quickly. I could possibly reduce this by 1/3 by using only one screw on the 8" board. The other thing that I don't much care for is the hex head showing all over my siding. It's not a huge deal as I am more interested in functionality than appearances, but I know my wife is not as forgiving appearance wise. It will be painted, so it might now show as much. This could be avoided by using strapping over the foam but there is the extra cost of the screws for the strapping and the strapping itself.
As far as the overhang, I would feel much more comfortable with more rather than less. Since I have moved up here to New England, I have noticed how little overhang some of the homes have and have wondered about it. It just seems like it would be asking for trouble to leave only 3" of overhang (1" if I use strapping). I know that having the rain screen could mitigate this, but the rain screen is really for a backup, not to be relied upon for constant water exposure. For the rain screen to work properly, I need to vent it at the top and that means having an area that water can get in if not covered properly. So basically, to do this, I would have to replace my my fascia board and make it much wider to lower the bottom of it several more inches to act as the outer cover board to keep the rain out of the rain screen. With strapping, I am not sure I could do this as I would not have enough room to leave a gap between the siding and the fascia board to allow the rain screen to vent. I suppose I could vent it to the attic space in that case.
Dana1, you said that if I put 15# felt and don't use the poly on the interior, that I would have a fighting chance of the wall system lasting another 100 years. If I did the cut and cobble method and stuffed fiberglass around the sides of the foam between the studs, would that make for a better system where the wall could breath to the inside as well?
Arkie6, thanks for the calculations on the cost of the foams. That was nice.
Bob I, wouldn't the roofing felt on the outside of the sheathing be a good air barrier? Seems like it would be just as good as the foam boards.
So after all of my ramblings, in the end I am really trying to balance cost, performance, and time with the priorities in that order. Thank you.
|
|
|
|
|
Dana1
Senior Member
Posts:6991
|
| 05 Feb 2014 03:54 PM |
|
Hold the foam in place with lateral furring through-screwed to the studs, and hang the board & batten on the furring-only, not through to the sheathing.
You'll of course have to add sill extensions and other detials at the windows, and any window-flashing should be lapped properly to the felt layer.
Using fiberglass instead of foam to seal cut'n'cobble to the studs is the OPPOSITE of what you want to do. It needs to be AIR TIGHT, since convection would provide copious transport of the indoor air to the colder exterior layers. The notion that a wall assembly has to "breathe" air-leaks is just wrong. The wall assembly needs to be able to dry, but that means "breathing" water vapor, not air. That's why #15 felt instead of #30, and why it's best to make the interior gypsum air-tight, but semi-permebable to water vapor: #30 felt has a vapor permeance of about 0.5 perms which is tight enough to begin to trap moisture, but #15 felt is between 2-5 perms when dry, but 50+ perms if it's actually wet, and will never trap moisture. Standard latex paint runs 3-5 perms. Six mil poly runs about 0.05 perms, and is a severe vapor barrier.
So if you had 0.5 perm felt on the exterior, and 0.05 perm poly on the interior, the only drying direction is toward the exterior, but at a VERY slow rate, and since the exterior would be prone to rain-wetting through the board & batten, it the direction of moisture migraition would sometimes reverse, putting moisture into the wall cavities, without any hope of drying toward the interior.
Fiber faced polyiso runs about 0.5-1 perms, and while it passes water vapor only very slowly, it permeable enough to provide at least some seasonal drying, and in a cut'n'cobble is an adequate vapor retarder to limit wintertime moisture accumulation from interior moisture drives to very tolerable levels. But if you let air convect through fiberglass at the edges you will have ruined that characteristic. A single square inch of air-leak can move 10-100x as much moisture as an entire wall's worth of vapor diffusion through latex paint, and something like 1000x as much moisture as vapor diffusion through a 0.5 perm facer. Air-seal both the interior & exterior but let it "breathe" at least little bit of water vapor in either or both directions, and the assembly will survive.
But, when you put enough foam on the exterior of the sheathing, the sheathing stays above the dew point of the conditioned space air enough hours of the winter that it doesn't accumulate much moisture even IF there are minor air leaks.
With an air gap established between the board & batten and the exterior foam bulk water intrusions behind the siding due to minimal overhangs still dry rapidly and result in no consequential damage. Were the board & batten flush up to the felt layer it would dry an order of magnitude more slowly, and WOULD be a problem (primarily for the board & batten siding, but also for the sheathing.) |
|
|
|
|
dragon73
New Member
Posts:6
|
| 05 Feb 2014 10:34 PM |
|
Thanks Dana1. That was very clear and I understand much better how the cut and cobble system will work. As far as the detailing around the windows using the foam on the exterior, I am still not certain. I understand what you mean by lapping the flashing with the felt layer, but I still don't quite know what to do with the sill plate. I have attached a picture of what I used. This is a picture I got off of the internet, but I installed it the same as in the picture and then flashed the sill with Vycor flashing tape. So I am not sure how I would make this work. The only thing I can think of is to put a piece of z-flashing just under the bottom of the Vycorners and have the tape and felt lap over the top of the z-flashing and the bottom of the z-flashing lap over the top of the foam board and felt. The sides would be kind of the same but without the z-flashing and then just do another sill with the vycorners again at the corners of the foam. Then install trim board over the gaps to hide the spaces below and to the sides of the window. This would have been a lot easier if I had planned to do the foam on the outside before I installed the windows. It might just be easier to remove the windows and fur out the openings and have the windows sit flush with the foam instead of the sheathing. I would hate to do that, but at this point, it would only be 4 windows (though very big windows) as I have not installed the others in the rest of the house yet. Some extra work now might save me a lot of work later. I think I am leaning toward putting the foam on the outside now. Is this something I can do in the cold of winter? Finish my interior work and then save the foam and siding for the spring? Right now I only have the 30# felt over the sheathing. It seems to be keeping things dry. I want to get my drywall up. Will I be causing any problems if I fill the wall cavities with fiberglass and then sheetrock?
P.S. Just thought of another thing. If I install the furring across the foam boards to hold them on, do I run the 15# felt over the foam and furring? I suppose this would make sense as the first run of furring will be vertical and the felt would help protect it. Then run the horizontal furring over that?
P.S.S. There are so many things to think about with this. How far down do I run the foam on the exterior? There is a foundation that sits about 1-1/2 feet high at one side and tapers down to almost nothing as it goes around the corner of the house. There is a crawl space under this portion of the house. I have to make sure I keep the ants out. I am having to remove all of my oak flooring in one room and need to replace the subfloor because carpenter ants have eaten it away. I don't want to have that happen again and I have read that they can eat through the foam right into the house and I would never see them. I know it's not ideal, but the siding comes very close to the ground on one side of the house. The other two sides of the house sit a fair height off the ground and should be ok.
|
 Attachment: vycorner.jpg Attachment: vycorner.jpg
|
|
|
|
Dana1
Senior Member
Posts:6991
|
| 12 Feb 2014 03:23 PM |
|
Copper Z-flashing at the bottom of the foam usually deters carpenter ants and termites. Carpenter ants are usually (but not always) an indication of high moisture content in the wood. With board & batten on plank sheathing with no exterior foam the moisture content of the sheathing and framing will be significantly higher than with a foam-over. When the housewrap/felt is between the foam, Z-flashing is typically installed at the bottom of the sheathing &/or foundation sill, lapped & sealed correctly to the Z-flashing, and the rigid foam essentially rests on it like a ledge. (Other metal flashing can be used, but copper is a better deterrent for termites, since the leaching copper bleeding down the foundation into the soil makes it toxic to them &/or their gut flora.) In Hobbits' foam-over they installed bug-screen at the Z-flashing too, to keep critters out of the rain-screen gap, which is another common detail (to any rain-screened siding, not just under foam-over retrofits): 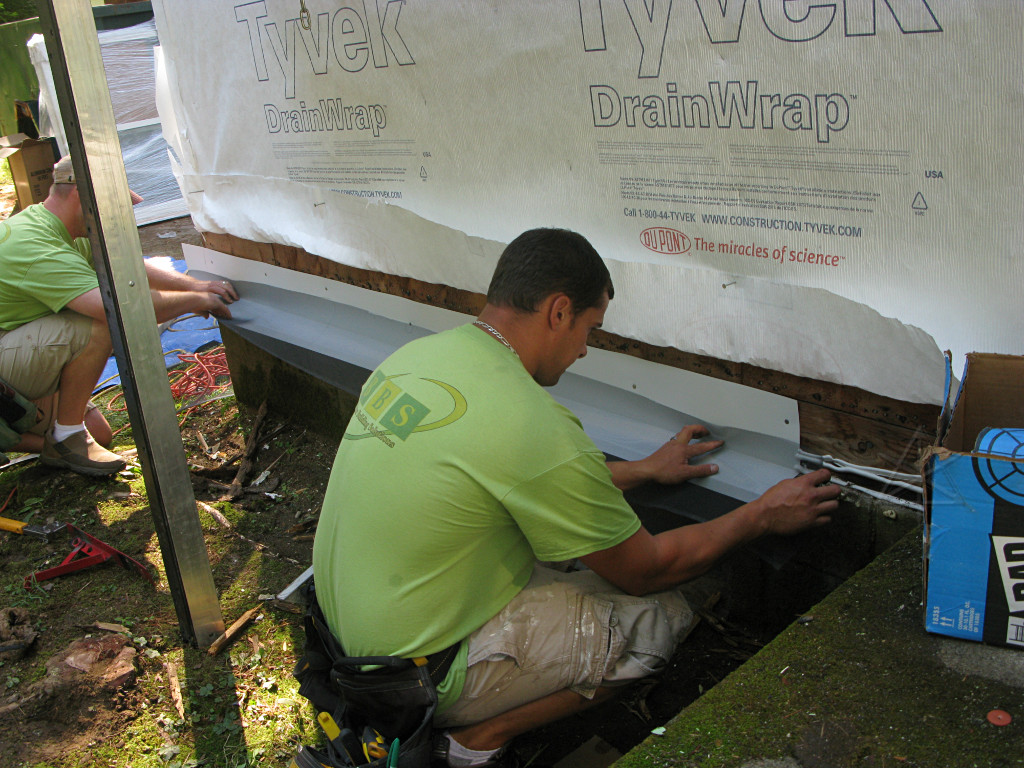 Insulating the wall cavites with cellulose is also inhibits all wood-boring insects, since the borate fire retardents used are toxic to the gut flora those insects need to break down the wood fiber. A lot of questions about how to detail windows & doors etc on foam-overs can be found on the links on this bit o' bloggery. There's a whole section about window detailing and flashing that you can clip and save for the low price of a 10 day free pro-membership on that site, but the gist of it as well as detail drawings can be found elsewhere ( see p14 $ 15 for innie-window flashing & sill detail). You don't need to re-invent the wheel here, it's a well trodden path. Unless you're re-mounting the windows to an "outie" position, the #felt would go between the foam and the sheathing, not on the exterior side of the foam. But a crinkle-type housewrap is a better choice than #15 felt in that stackup, since it can be detailed as an air barrier, and provides a bit of capillary break between the foam & sheathing, which is important when the drain-plane is buried in the stack-up like that. |
|
|
|
|
| You are not authorized to post a reply. |
|
Active Forums 4.1
 |
Membership: |
 |
Latest:
croccohvacusa |
 |
New Today:
0 |
 |
New Yesterday:
0 |
 |
Overall:
35027 |
 |
People Online: |
 |
Visitors:
185 |
 |
Members:
0 |
 |
Total:
185 |
|
|
|