EnergyWiseBuilding

New Member

Posts:80

 |
| 12 Mar 2011 05:07 PM |
|
I have a one-time customer looking for bracing. He is in the middle of South Dakota and there is no where to rent bracing. What options are the best options? |
|
|
|
|
|
|
arkie6

Veteran Member
Posts:1453
|
| 13 Mar 2011 05:21 AM |
|
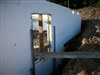
I built my own bracing from 2x4's and 4x8 sheets of 1/2" plywood. Directions for building this type of bracing is in the original Lite-Form ICF installation manual (the installation guide currently on their website doesn't contain this info). You may be able to get access to the original manual by calling their 1-800 #. The pdf attachment at the bottom of the page contains the details for building the plywood cleat; although, I modified it slightly to get full use of a 4x8 sheet of plywood with little waste. To make 18 braces will require: 18 straight 2x4s for the vertical uprights (length ~ equal to wall height) 18 relatively straight 2x4x8' for the 45 degree kickers 3 extra 2x4s ripped in half to make the angle brackets 1 4x8 sheet of 1/2" plywood for the cleats (15-7/8" x 15-7/8" plywood cut in half) If you need 36 braces, then just double the above quantities. All of the 8' and 9' 2x4s below will get reused in the interior framing, so there is little overall waste with this bracing. The treated 2x12 walkboards will become my top plate after the pour is completed.   |
 Attachment: ICF_bracing_3.pdf Attachment: ICF_bracing_3.pdf
|
|
|
|
wes

Advanced Member
Posts:810
|
| 13 Mar 2011 09:12 AM |
|
EnergyWise,
I have drawings of the 2x4 bracing design that we have used for many years now. No plywood, and all the wood can be recycled into the framing of the project. If you are interested, sent me an email address, and I will send them to you.
|
|
| Wes Shelby<br>Design Systems Group<br>Murray KY<br>[email protected] |
|
|
EnergyWiseBuilding
New Member
Posts:80
|
| 13 Mar 2011 07:10 PM |
|
Nice pictures, and thanks for the attachment. Where is a good place to get the turnbuckle?
Wes, I emailed you for your design. Thank you. |
|
|
|
|
Alton
Veteran Member
Posts:2164
|
| 13 Mar 2011 09:01 PM |
|
Here is a company that has an extensive list of turnbuckles and other accessories: http://www.clevelandcityforge.com/
Just in case you have not used turnbuckles, let me mention that keeping them free of concrete and dirt is the way to go. Clean turnbuckles are much easier to operate and I think they will last longer. Once you use turnbuckles, I do not think that you will want to do without them especially when it comes to bracing a wall plumb.
|
|
Residential Designer &
Construction Technology Consultant -- E-mail: Alton at Auburn dot Edu Use email format with @ and period .
334 826-3979 |
|
|
KIDD
New Member
Posts:1
|
| 21 Jun 2011 11:04 PM |
|
Nice pics, do you bevel the 2x support on the top? I believe you said its a 45 degree support just not sure if the top is untouched. Thanks this is a huge help!! |
|
|
|
|
arkie6
Veteran Member
Posts:1453
|
| 22 Jun 2011 12:10 AM |
|
Posted By KIDD on 21 Jun 2011 11:04 PM
Nice pics, do you bevel the 2x support on the top? I believe you said its a 45 degree support just not sure if the top is untouched. Thanks this is a huge help!!
On my bracing shown in the photos above, the 2x4x8' brace coming off at a 45 degree angle is untouched on the end that fits inside the plywood cleats. I did make a 45 degree cut on the bottom end so that it rests flat on the floor. |
|
|
|
|
EnergyWiseBuilding
New Member
Posts:80
|
| 22 Jun 2011 06:28 AM |
|
Has anyone use those Zonts by Fab-Form? |
|
|
|
|
lzerarc

Basic Member
Posts:423
|
| 22 Jun 2011 10:27 AM |
|
Arkie looks good. Looks like a near "free" bracing system. How long do you think it took you to build them all and assemble them? For plumbing, I assume you just adjusted the 45 kicker inside the plywood and then screwed it through the ply once plumb? |
|
|
|
|
JosephFearn
New Member
Posts:75
|
| 22 Jun 2011 12:43 PM |
|
Arkie, how high was the wall you were building?
Did you have any shrinkage occur on the wall when you were pouring concrete? We did a similar pour with lumber bracing a long time ago, but the wall shrunk and pulled down on the 2x4 strongbacks. Pulling the walls' outside blocks apart slightly. Safe to say it mucked up our alignment, and was a bit of a headache.
I suppose having it wire tied may allow it to shrink independently from the brace. |
|
|
|
|
arkie6
Veteran Member
Posts:1453
|
| 22 Jun 2011 06:40 PM |
|
Posted By lzerarc on 22 Jun 2011 10:27 AM
Arkie looks good. Looks like a near "free" bracing system. How long do you think it took you to build them all and assemble them? For plumbing, I assume you just adjusted the 45 kicker inside the plywood and then screwed it through the ply once plumb?
Assembling the plywood brackets took a couple of hours, maybe. I only had to make ~18 of the brackets because my ICF supplier loaned all of his old plywood brackets. Assembling the braces in the basement went pretty quick - probably as fast as any other system. I screwed the 45 deg kicker into the plywood bracket first. Then I used a C-clamp to lightly hold the kicker to the wood block that I had attached to the slab with a tapcon. I adjusted the wall brace until plumb, tightened the C-clamp a half turn to lock it in place, then screwed a 3" deck strew through the kicker into the wood block on the slab. Remove C-clamp and move to the next brace. I had to make a few minor adjustments after the wall got to full height. I again lightly clamped the kicker to the block with a C-clamp, backed out the 3" deck screw as needed, moved wall in or out as required, tightened C-clamp if needed to hold the kicker, then screwed the 3" deck screw back into the wood block. |
|
|
|
|
arkie6
Veteran Member
Posts:1453
|
| 22 Jun 2011 06:53 PM |
|
Posted By JosephFearn on 22 Jun 2011 12:43 PM
Arkie, how high was the wall you were building?
Did you have any shrinkage occur on the wall when you were pouring concrete? We did a similar pour with lumber bracing a long time ago, but the wall shrunk and pulled down on the 2x4 strongbacks. Pulling the walls' outside blocks apart slightly. Safe to say it mucked up our alignment, and was a bit of a headache.
I suppose having it wire tied may allow it to shrink independently from the brace.
From the top of the slab, the wall is 9'3" high (9'8" from the top of the footing). My vertical braces are 9'6" long. I haven't done the pour yet. The ICF stacking and rebar installation is complete but I have a few anchor bolts and penetrations that I need to install. The problem is that my real job and life in general sometimes gets in the way of working on this as much as I would like. Using the wire to tie the ICF to the vertical bracing rather than tightly screwing the bracing to the ICF will allow some vertical movement as needed. The distributor of my ICF has been using this same method for many years with good results, but he now uses metal studs for the vertical braces and nylon scaffold brackets like in the pdf below rather than plywood brackets to attach the kicker brace and walkboard to the vertical brace. |
Attachment: ICF_bracing_2.pdf
|
|
|
|
jeepster
Basic Member
Posts:153
|
| 23 Jun 2011 07:24 AM |
|
Ellis forms in OK has turnbuckles for about 11-12 bucks a piece.
http://www.ellisforms.com/managed_files/2589/2010PriceList.pdf |
|
|
|
|
Bruce
Basic Member
Posts:142
|
| 23 Jun 2011 09:25 PM |
|
Arike, do you have any idea what that Lite-Form Nylon scaffold bracket costs?
Thank you,
Bruce |
|
|
|
|
arkie6
Veteran Member
Posts:1453
|
| 23 Jun 2011 11:06 PM |
|
Posted By Bruce on 23 Jun 2011 09:25 PM
Arike, do you have any idea what that Lite-Form Nylon scaffold bracket costs?
Thank you,
Bruce
No. Having only one project to do, I never looked into purchasing those. If you call the Lite-Form number @ 1-800-551-3313, I'm sure they will give you a quote for them or put you in contact with a local distributor that will quote them.
|
|
|
|
|
smartwall
Veteran Member
Posts:1209
|
| 24 Jun 2011 08:03 AM |
|
$26-$27 as I can remember |
|
|
|
|
arkie6
Veteran Member
Posts:1453
|
| 30 Jul 2011 02:36 PM |
|
I finished my basement wall pour yesterday. Boy was it hot and humid even starting at ~6:00 am. 42 yds of concrete poured and top of wall finished by 11:00 am (first load was delayed a bit and didn't arrive till nearly 7:00 am). It was ~75F when we started and ~85F by 11:00 am, but the humidity was through the roof.
I had been waiting for ~2 weeks to get a break in this heat, and this past Friday was the lowest forecast temperature we had seen for over a month. Temps were only projected to get hotter in the coming weeks.
Everything worked just fine during the pour. The wall braces didn't move any and the top of the wall remained within +/- 1/8" of my string line without making any adjustments to the bracing. I set my forms inside the string lines by ~1/8" and that is pretty much where they stayed during the pour. I had all of my vertical rebar tied and hung from the top horizontal bar for several weeks, so that probably helped to insure the foam was fully compressed. I had set my wood door bucks ~1/2" above the footing and it didn't appear that any measurable drop occurred during the pour.
The concrete mix we used was 4000 psi, 3/4" crushed stone (maximum), 5.5" slump with a water reducing additive, and retarder due to the high temperatures. We needed 4 loads of concrete for this pour so we poured it in 4 lifts of ~30 inches. We had no blowouts or even anything remotely looking like a potential blowout. Fortunately I live only ~10 miles from the batch plant so the concrete only remained on the trucks <30 minutes prior to moving to the pumper.
I assembled all of my ICFs, reinforcement, and bracing, but I had an experienced crew supplied by my ICF distributor running the concrete hose and vibrating the walls. They inspected the walls several weeks prior to the pour to make sure everything was OK and they assured me that there would be no problems during the pour. Right they were. |
|
|
|
|
jeepster
Basic Member
Posts:153
|
| 30 Jul 2011 04:12 PM |
|
Good to hear it was a success Arkie!
So it took 4 hours to pump 42 yards? That seems like a long time. Since you did this in four lifts, it took about an hour to get around the walls. Was the previous lift set up when you started over with the next lift?
How thick were your walls? I'm getting ready to pour my second level next week and I'm trying to finalize the details. Like you, it's been very hot and humid here. Heat advisories ever day for the past few weeks. 6am it's been about 80 degrees outside and heating up to 95 or so by 3pm. Not ideal by any means. Does the water reducer help under these conditions? |
|
|
|
|
arkie6
Veteran Member
Posts:1453
|
| 30 Jul 2011 05:14 PM |
|
It took ~30-35 minutes per load to pump it and vibrate it. The first load took a little longer because we had to fill up under the window sills on the walkout side of the basement. There was a little bit of a delay on the last load as the guy doing the pour wanted to see where we were at before he ordered it. Since we were only ~15 minutes away from the batch plant it wasn't that big of a deal. Between lifts the prior lift would stiffen up a bit, but I wouldn't call it set up. We were finished pumping by ~10:30. The last 30 minutes or so was vibrating and leveling off the top of the concrete and setting the rebar dowels for the next level.
My basement walls are 8" thick, 188 linear feet, 9'9" tall. The walls for the main floor above will be 6" thick.
The water reducer is needed/recommended with the higher slump concrete to keep the water/cement ratio where it needs to be. The retarder helps to slow the setting when conditions are hot. |
|
|
|
|
jeepster
Basic Member
Posts:153
|
| 31 Jul 2011 07:24 AM |
|
Thanks Arkie.
Did you use a 1" vibrator? With my 6" walls, I think it'll be tricky to even fish a 1" vibrator through the rebar. There's probably only a 1-1/2" gap between the staggering. Today or tomorrow I'm going to fabricate a rebar vibrator to use with an angle grinder. Since I have vert rebar every 18" or so, I'm thinking that will do the trick. I'll go ahead and rent the vibrator just in case.
|
|
|
|
|