Surfsup

Basic Member

Posts:349
 |
| 23 Oct 2013 02:43 PM |
|
Zone 5. I require 1-3/8" poly on the outside to control the dew point. I am finding installation of exterior siding or any exterior stone, etc. is a problem with this thickness of poly so I am going to likely use a single 3/4" layer...
In this regard since it is not enough to control the dew point, what should the wall detail look like? I assume vapor barrier should be toward inside of house
For siding as an example:
Drywall
vapor barrier
2x6 with HD batt
polyiso 3/4" caulked and nailed
house wrap
possible furring strips screwed to stud (treated or non treated?)
siding
for stone veneer (1-1/4" thick):
Drywall
vapor barrier
2x6 with HD batt
polyiso 3/4" caulked and nailed
felt wrap
lath screwed to stud
mortar/stone veneer
|
|
|
|
|
|
|
DENALI

New Member
Posts:41
|
| 24 Oct 2013 08:26 AM |
|
From the research i have done hardie cement lap siding will go over 1.5 inches of rigid foam without strapping required. It is what i plan to do with a 1904 house renovation i am just getting started on. |
|
|
|
|
Surfsup
Basic Member
Posts:349
|
| 24 Oct 2013 09:48 AM |
|
I'd love to know who you spoke to or how you got this info. They do recommend backing (non-rainscreen) due to the product being thin and unsupported it will bend and look bad.
I am mostly concerned about the long nails and exterior corners. If the corner is built out 1.5" what is edger board tied into? I suppose a very wide board can be used. I have not found a product that is made to accommodate for this yet.
The biggest thing I see is no matter what the product is, none of the reps seem to know anything about how to install with an exterior rigid product - or they say "oh yea, whatever, it's no problem!" which tells me they are just pulling an answer out of their ---. That doesn't sit well with me. |
|
|
|
|
Dana1

Senior Member
Posts:6991
|
| 24 Oct 2013 05:18 PM |
|
Dude, yer scarin' me- is it Halloween yet?
In the trades the term "poly" usually refers to polyethylene sheeting, not polyisocyanurate, not polystyrene.
In your stackup using MemBrain or Intello Plus or similar for the interior side vapor retarder is going to be worth the freight. And UNDER NO CIRCUMSTANCES should you be using foil or polyethylene vapor barriers on the inside, since the foil facers on 3/4" polyiso are themselves power class-II vapor retarders, and putting 0.05 perm polyethylene on the interior means that there is no way for the assembly to dry in any reasonable amount of time- even the moisture present from freshly cut timber or studs that got rained on during construction would still be there years later(!).
MemBrain or Intello Plus are variable-permeance, and will run ~1 perm or a bit below when the interior air is 35% RH or lower, as it it would be during the winter if you ventilate sufficiently, which makes it protective of the much-colder sheathing. Then in spring when the sheathing warms up and releases it's winter load (or when bulk water somehow gets into the cavity) the higher RH of the cavity air causes these products to become more vapor open, in which case the drying rate is determined by the latex paint on the gypsum (which is 100x faster than through 6 mil polyethylene.)
|
|
|
|
|
Surfsup
Basic Member
Posts:349
|
| 25 Oct 2013 09:14 AM |
|
Dana thanks for commenting. In regards to my use of 'poly' I think it is quite clear I am referring to polyiso exterior as a 1-3/8" thickness, not a membrane. What membrane would be added under gypsum that is 1-3/8" thick? I also reference polyiso specifically in the detail breakdown. However, I will write polyiso from now on.
I did realize yesterday at some point to forego the vapor "barrier" in favor of either nothing or a vapor "retarder" (? - insert proper term here). Membrain is certainteed so I assume most lumber yards can get it easily. I have an appointment in an hour with one lumber yard so will certainly bring it up.
So if I use less than the 30% 2x6 exterior cavity insulation on the outside, is it sufficient to say using the MemBrain will be sufficient to prevent mold?
Drywall
- MemBrain or equivalent
- 2x6 with HD batt
- polyiso 3/4" caulked and nailed
- house wrap
- (optional) possible furring strips screwed to stud (treated or non treated?)
- siding
for stone veneer (1-1/4" thick):
Drywall
- MemBrain or equivalent
- 2x6 with HD batt
- polyiso 3/4" caulked and nailed
- felt wrap
- lath screwed to stud
- mortar/stone veneer
|
|
|
|
|
jonr
Senior Member
Posts:5341
|
| 25 Oct 2013 09:57 AM |
|
polyiso 3/4" caulked and nailed I would use tape, for both the polyiso and the MemBrain. Consider a double layer of stucco wrap instead of felt under stone veneer. Also consider putting foam (any type) on the inside and using OSB on the outside. |
|
|
|
|
Surfsup
Basic Member
Posts:349
|
| 25 Oct 2013 10:25 AM |
|
Whoops. Per code here there is 1/2" of sheathing on the 2x6 exterior as well. Can't believe I left that out.
Per Dow, you should not tape the polyiso due to eventual expansion/contraction...
http://www2.dupont.com/Tyvek_Weatherization/en_US/assets/downloads/pdfs/K25107_Weather_Barrier_a_Must_with_Exterior_Foam_Sheathing_Tech_Bulletin.pdf |
|
|
|
|
jonr
Senior Member
Posts:5341
|
| 25 Oct 2013 10:32 PM |
|
Don't confuse using tape to provide a more effective air barrier than caulk or staples with using foam+tape (vs something like stucco wrap+tape) as a WRB. Expansion/contraction is why you want to avoid caulk. And two air barriers work better than one. See here and here (tape is explictly recommended). |
|
|
|
|
Surfsup
Basic Member
Posts:349
|
| 26 Oct 2013 09:41 AM |
|
I'm not, in the article Dow clearly states repetitively not to tape.
Drywall
Membrain or equivalent
2x6 framing
R21hd batt
1/2" sheathing
Polyiso 3/4" in zone 5
Tyvek housewrap outside the polyiso
Windows furred out with 1x2s flange mounted to the furring strips
I will prob tape the polyiso anyway unless i switch to a sprayfoam for the cavity insulation. I'm still debating 1.5" polyiso. I spoke to james hardie and they said 1.5" is the max but its okay to nail through if installers use long enough nails (8D).
|
|
|
|
|
Dana1
Senior Member
Posts:6991
|
| 29 Oct 2013 11:50 AM |
|
Whether the WRB goes under or over the iso depends on how you intend to mount & flash the windows- sounds like you're mounting them "outie". If mounting them, where the glass is roughly co-planar with the siding the flashing for the windows drains to the outside of the foam, so that's where the housewrap lives, and a smooth housewrap is fine. With foam less than 2" thick it's usually easier to mount the windows "innie", roughly co-planar with the structural sheathing, in which case the housewrap should be the crinkly type (for a better capillary break, eg Tyvek Drainwrap), and mounted between the iso and 1/2" sheathing to lap properly with the flashing. NEVER long-nail through the foam to mount the siding!The thermal conductivity of steel is a few orders of magnitude higher than the foam, robbing the foam of much of it's thermal performance. Instead, through-screw the furring to the studs 24" o.c. with pancake head timber screws (eg. FastenMaster HeadLok), and mount the Hardie to the furring with ring shank nails of the appropriate fiber-cement compatible materials, of a length that doesn't penetrate significantly into the foam.  Hobbit's spacing on the timber screws was a bit tighter than that, which is sometimes done for better wall flatness when using more flexible siding, but at performance cost due to the somethat higher thermal bridging. With fiber-cement it'll usually be flat enough at 24" o.c. spacing: 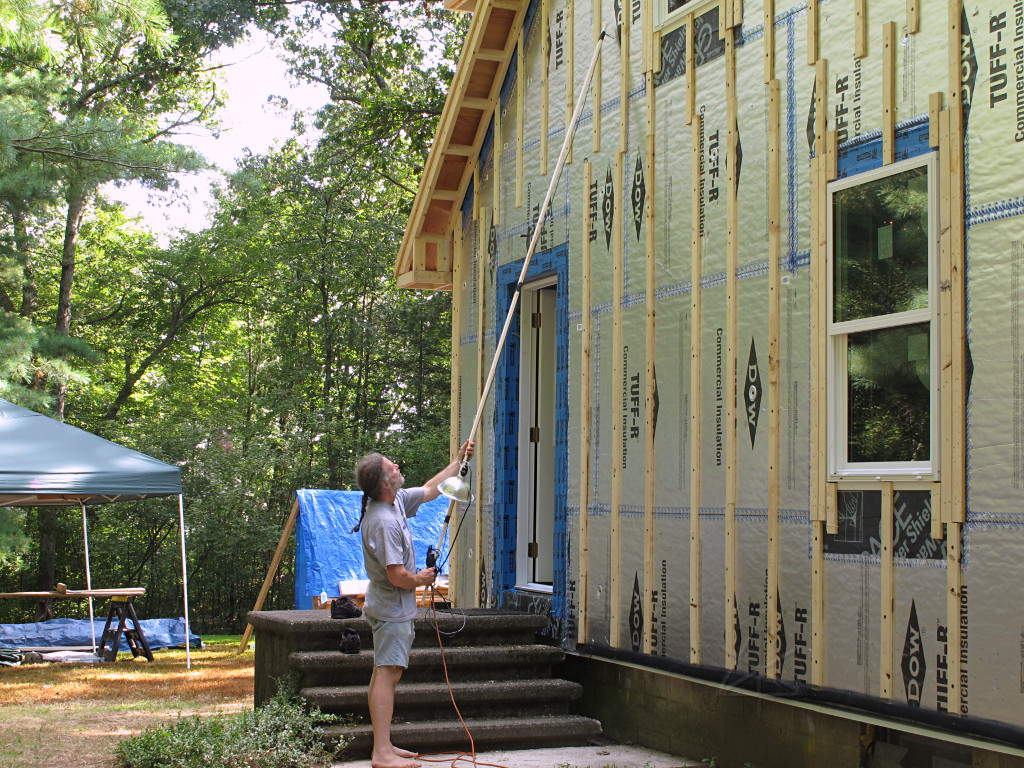 |
|
|
|
|
jonr
Senior Member
Posts:5341
|
| 29 Oct 2013 02:35 PM |
|
Apparently FM intends HeadLOKs to be used only through the siding and foam. But don't worry, the thermal difference is small. |
|
|
|
|
Dana1
Senior Member
Posts:6991
|
| 31 Oct 2013 01:31 PM |
|
Posted By jonr on 29 Oct 2013 02:35 PM
Apparently FM intends HeadLOKs to be used only through the siding and foam. But don't worry, the thermal effect is small.
Huh? See step 6 on page 5. From that section it would seem to be intended to be used through the furring + foam + sheathing (and not the siding) with 2" minimum penetration into the stud (though people seem to use 1.5" stud penetration and get away with it.) |
|
|
|
|
jonr
Senior Member
Posts:5341
|
| 31 Oct 2013 10:09 PM |
|
I was looking at step 5.1 where it includes cladding. But maybe their use of "and/or" is saying that this is optional.
In general, if someone is concerned about fastener heat loss (say both ends are exposed), use stainless steel at about 1/3 the heat loss of steel. |
|
|
|
|
ICFHybrid

Veteran Member
Posts:3039
|
| 02 Nov 2013 09:05 AM |
|
Hobbit's spacing on the timber screws We need some quick explanation on that image, Dana1. Is that really a Hobbit? And, what the heck is he doing there, using the world's longest hot knife or screw gun? |
|
|
|
|
Dana1
Senior Member
Posts:6991
|
| 02 Nov 2013 12:14 PM |
|
Posted By ICFHybrid on 02 Nov 2013 09:05 AM
Hobbit's spacing on the timber screws We need some quick explanation on that image, Dana1. Is that really a Hobbit?
And, what the heck is he doing there, using the world's longest hot knife or screw gun?
"Hobbit" is the name he goes by, so that's what I call him.
Not sure what the heck he's doing in that pic- looks like some sort of gripper-thingy.
His very detailed explanation of his deep energy retrofit lives here:
http://techno-fandom.org/~hobbit/hse/log/878784/ |
|
|
|
|
FBBP
Veteran Member
Posts:1215
|
| 02 Nov 2013 02:35 PM |
|
Re Picture - as they say "worth a thousand words." For those asking questions about the order of installing flashings, membranes, strapping etc., it's worth studying this picture.
I'm not sure what he is using for bug screen at the bottom but it makes clear how it should be done. Windows are also properly flashed in the correct order, under then over.
I would point out that he has not as yet vented the top of the window or allowed for air flow under the window. Sometimes just leaving some gap on the side strapping allows the air flow under the window to move over to beside it, eliminating the need for a separate vent under the window. The same can be done over the window.
Venting is continued into the soffit so no top screen is required. |
|
|
|
|
Bob I
Veteran Member
Posts:1435
|
| 02 Nov 2013 04:00 PM |
|
the screening at the bottom is to keep small creatures out of the cavity; pieces of roll vent (used on roof ridges) also works well there. Venting the cavity under the windows or at the top is usually not that important as the siding is not water or air tight and will not often contain liquid water. It should be open at the bottom so it will drain if necessary. |
|
| Bob Irving<br>RH Irving Homebuilders<br>Certified Passive House Consultant |
|
|
Surfsup
Basic Member
Posts:349
|
| 02 Nov 2013 07:06 PM |
|
ANother question about the wall...so as a reminder
Drywall
Membrain or equivalent
2x6 framing
R21hd batt
1/2" sheathing
Polyiso 3/4" in zone 5
Tyvek housewrap outside the polyiso
Windows furred out with 1x2s flange mounted to the furring strips
If I have a shower on an exterior wall, the rockboard, waterproofing and tile will cover up the membrain on that shower wall. How do I compensate for that?
In the article they use a 1/2" layer under the window frame furring. I thought of doing that but figured it would not be good structurally. Maybe I will reconsider |
|
|
|
|
W.Lowery
New Member
Posts:1
|
| 02 Nov 2013 08:09 PM |
|
See link http://www.buildingscience.com/documents/insights/bsi-001-the-perfect-wall
The perfect wall is an environmental separator—it has to keep the outside out and the inside in. In order to do this the wall assembly has to control rain, air, vapor and heat. In the old days we had one material to do this: rocks. We would pile a bunch or rocks up and have the rocks do it all. But over time rocks lost their appeal. They were heavy and fell down a lot. Heavy means expensive and falling down is annoying. So construction evolved. Today walls need four principal control layers—especially if we don’t build out of rocks. They are presented in order of importance:
a rain control layer
an air control layer
a vapor control layer
a thermal control layer
A point to this importance thing here, if you can’t keep the rain out don’t waste your time on the air. If you can’t keep the air out don’t waste your time on the vapor.
The best place for the control layers is to locate them on the outside of the structure in order to protect the structure (Figure 1). When we built out of rocks the rocks didn’t need much protection. When we build out of steel and wood we need to protect the steel and wood. And since most of the bad stuff comes from outside the best place to control the bad stuff is on the outside of the structure before it gets to the structure.
Also, after generations of building out of rocks folks somehow got the idea that they wanted to be comfortable—and they figured out that rocks were not the best insulation. I mean rocks are not that bad compared to windows—memo to architects: you can’t build an energy efficient green building out of glass, but you can get design awards and we all know which is more important. Back to rocks, they are heavy and you need a lot of them to make the wall have any decent thermal resistance so we invented thermal insulation.
But where to put the insulation? If we put the insulation on the inside of the structure the insulation does not protect the structure from heat and cold. Remember we really do want to protect that darn structure—especially for the sake of making the structural engineers life more happy. Expansion, contraction, corrosion, decay, ultra violet radiation, and almost all bad things all are functions of temperature. So all the control layers go on the outside. Keep the structure from going through temperature extremes and protect it from water in its various forms and ultra violet radiation and life is good.
Figure 1: “The Perfect Wall”—In concept the perfect wall has the rainwater control layer, the air control layer, the vapor control layer and the thermal control layer on the exterior of the structure. The claddings function is principally to act a an ultra-violet screen. Oh, and architects might consider the aesthetics of the cladding to be important.
What about this air control thing? Well air can carry a lot of water and water is bad for the structure. So we have to keep air out of the structure as well because of the air-water thing—or if we let it get into the structure we have to make sure it does not get cold enough to drop its water. Now, just one other thing, tends to be important if you intend on living in the building or working in the building or keeping things safe in the building, we might want to control the interior environment. We especially ought to be concerned about what is in the interior air because when we are in the interior we tend to breathe it. Well, it turns out that we can’t control air until we enclose air. So we need an honest to god airtight enclosure in order to provide conditioning such as filtration and air change and temperature and humidity control. And once again the best place to control this air thing is on the outside of the structure—but under the insulation layer so the air does not change temperature. Presto: the perfect wall. A water control layer, air control layer and vapor control layer directly on the structure and a thermal control layer over the top of the other control layers (see Figure 1 again).
This was figured out long before I was born—I think the Canadians figured it out first [1], but the Norwegians have some claims to this plus the Russians. I am going to go with the Canadians on this one because I am biased and proud of it. Also, I met Professor Hutcheon, and that is a story for the grandkids when I get some—memo to Christy and Andrew: so what’s the delay here? For a more detailed discussion of the physics of all of this go to the old masters: Hutcheon and Handegord [2] and the new kids on the block Burnett and Straube [3].
In a beautiful bit of elegance and symmetry if you lie the perfect wall down you get the perfect roof (Figure 2) and then when you flip it the other way you get the perfect slab (Figure 3). The physics of walls, roofs and slabs are pretty much the same—no surprise (Figure 4). This insight was shone into a whole generation of practioners by Max Baker [4] when I was first getting started.
Figure 2: "The Perfect Roof"—The perfect roof is sometime referred to as an “inverted roof” since the rainwater control layer is under the insulation and ballast (i.e. roof cladding). Personally I don’t view it as inverted. Those other folks got it wrong by locating the membrane exposed on the top of the insulation—it is they that are inverted.
Figure 3: "The Perfect Slab"—The perfect slab has a stone layer that separates it from the earth that acts as a capillary break and a ground water control layer. This stone layer should be drained and vented to the atmosphere— just as you would drain and vent a wall cladding.
Figure 4: A Wall is a Roof is a Slab—The physics of walls, roofs and slabs are conceptually the same.
Notice in the perfect roof assembly the critical control layer or membrane for rainwater control and air control and vapor control is located under the thermal insulation layer and the stone ballast (i.e. “roof cladding”) so that it is protected from the principle damage functions of water, heat and ultra violet radiation. Arrhenius* would be proud. Why we put the most critical control layers on roofs on the very, very top where they can be trashed by these damage functions never fails to amaze me. Yes, I know, they are easier to replace when they are located there. Standard answer for our disposable, unlimited resource available society.
Most problems in building enclosures occur where roofs meet walls. The classic roof-wall intersection is presented in Figure 5 (will both credit and apologies to Max Baker). Notice that the control layer for rain on the roof is connected to the control layer for rain on the wall, the control layer for air on the roof is connected to the control layer for air on the wall . . . and so it goes. Beautiful. And when it is not so…ugly.
Figure 5: "The Roof-Wall Connection"—Notice that the control layer for rain on the roof is connected to the control layer for rain on the wall, the control layer for air on the roof is connected to the control layer for air on the wall…and so it goes.
Time to put some meat on the bones of Figure 1. How should this perfect “conceptual” wall actually be built? Three ways. The best of the best of the best can be found in Figure 6. This is a very special wall. I refer to it as the 500-year wall for two important reasons:
it represents 500 years of evolution; and
it will last 500 years
Figure 6: "The Institutional Wall"—The best wall that we know how to construct. Works everywhere in all climate zones.
It is the type of wall that you use for special buildings. Buildings that are passed down from one generation to the next. Museums, art galleries, courthouses, libraries. I call this wall the “institutional wall.” It is sweet in that it can be constructed in any climate zone. The only thing that may be changed is the level of thermal insulation. My advice here is very simple: what ever you think the right amount of thermal insulation should be double it and shut up. If you love your kids don’t argue with me.
A clever version of this first wall is where spray-applied closed-cell high-density foam is used to combine the four principal control layers in one material (Figure 7).
Figure 7: Clever Wall—One material combines four principal control layers
The second wall should be the “meat and potatoes” wall for commercial buildings. The wall every commercial building should use. The base wall that our infrastructure should depend on. So, no surprise I call it, yes you guessed it: the “commercial wall” (Figure 8). It has a conductive structure—metal studs. All of the insulation should—and must be located on the outside. It is a thermodynamic obscenity to insulate within a conductive structural frame. Again, you can build it anywhere in any climate location. Just consider the insulation levels (see above—particularly the part about loving your kids).
The third wall is the “residential wall” (Figure 9). Notice the structural cavity is insulated. That is because we are using a relatively non-conductive structural frame—the structure is wood and wood material based. Wood is not particularly conductive— that is why we do not have wood frying pans.
For this third wall to work almost everywhere (except Alaska and north of Flyn Flon** where we would not insulate even within a relatively non-conductive wood structural frame) we would split the thermal resistance of the insulation on the exterior of the structural frame with this insulation within the structural fame at least 50:50. So in an R-20 wall—at least R-10 or more on the outside of the non-conductive structural frame. And no vapor barrier on the inside of the assembly. Repeat after me, no vapor barrier on the inside of the assembly. We want the assembly to dry inwards from the control layers—and to dry outwards from the control layers. Always. Everywhere.
Figure 8: "The Commercial Wall"—The almost best wall we know how to construct. Affordable. Works everywhere in all climate zones.
Figure 9: "The Residential Wall"—The best residential wall we know how to construct. Not cheap. Works almost everywhere – except in extreme cold climates where we would not insulate within the wood structural fame.
|
|
|
|
|
Surfsup
Basic Member
Posts:349
|
| 07 Nov 2013 09:42 AM |
|
Yes but I was wondering what happens when you have a section of wall that has barrier on both sides (external barrier and a shower wall that is waterproofed)...I am wondering if there is enough vapor permeability along the wall to reach the gypsum to make this okay...? Starting from the inside:
Drywall
Membrain or equivalent
2x6 framing with R21hd batt
1/2" sheathing OSB
Polyiso 3/4" (zone 5 )
Tyvek housewrap outside the polyiso per Dow recommendation
Windows furred out with 1x2s flange mounted to the furring strips
If I have a shower on an exterior wall, the rockboard, waterproofing and tile will cover up the membrain on that shower wall. How do I compensate for that? |
|
|
|
|