natjwest

New Member

Posts:42
 |
| 13 Apr 2011 05:36 PM |
|

I think I found a pretty comprehensive overview of the ways to make bucks. One style missing is to cut the foam block 3" wider and taller on the inside and slip the buck into the opening from the inside, keeping a full face of foam on the outside.
Can anyone recommend AGAINST one of these options? I know everyone has their own favorite way, but are any of these ways bad? |
|
|
|
|
|
|
galnar
New Member
Posts:83
|
| 14 Apr 2011 12:55 AM |
|
We used approach #2 (2x12 treated) except on the bottom, which was left open (2 2x4 treated, open in the middle) so we could pour directly into it and vibrate it. |
|
|
|
|
arkie6

Veteran Member
Posts:1453
|
| 14 Apr 2011 07:11 AM |
|
I used approach #1 (2x10 ripped down to 8" wide for 8" cavity and 2x8 ripped down to 6" for 6" cavity) with a ripped 2x4 in the bottom to allow pouring under the window. I also attached the foam to the wood bucks with 3-1/2" screws and ~2" plastic washers that are typically used with EIFS. I think I got them from Demand Products online. The is the method described in the LiteForm installation manual.
|
|
|
|
|
smartwall
Veteran Member
Posts:1209
|
| 14 Apr 2011 07:37 AM |
|
Agree with Arkie |
|
|
|
|
natjwest
New Member
Posts:42
|
| 14 Apr 2011 12:55 PM |
|
Are the plywood options taboo?
And regarding option #1, I have also seen using a 2x8 (7 1/2" wide) and foaming the exposed crack.
Do you tie the buck back to the closest web to prevent movement in the cavity? Or is friction and bracing enough to keep it from moving during the pour? |
|
|
|
|
arkie6
Veteran Member
Posts:1453
|
| 14 Apr 2011 01:50 PM |
|
Posted By natjwest on 14 Apr 2011 12:55 PM
Do you tie the buck back to the closest web to prevent movement in the cavity? Or is friction and bracing enough to keep it from moving during the pour?
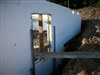
I'm not tying my bucks back. The screws and plastic washers every 8" around the perimeter hold it tight. In the photo below I have a temporary brace outside to hold the window buck until I had the inside bracing installed. I did install a vertical brace on either side of every window and door buck. Additional internal vertical and horizontal 2x4 braces installed after the buck was set in the wall. If you look closely, you can also see that I screwed 3" coated deck screws into the bucks approximately every 8" along the sides and top to help lock the wood buck to the concrete. I also used some left over fast foot to wrap the bucks prior to installation in the wall cavity.  |
|
|
|
|
arkie6
Veteran Member
Posts:1453
|
| 14 Apr 2011 01:55 PM |
|
Posted By natjwest on 14 Apr 2011 12:55 PM
And regarding option #1, I have also seen using a 2x8 (7 1/2" wide) and foaming the exposed crack.
For 6" wall cavities, I have seen guys use 2x6 bucks (5.5" wide) and rip some strips of 1/2" plywood to fill in the gap. That may save a few dollars, but not much. With today's poor quality lumber, I like having the extra wood of a 2x8 to work with so I can rip as needed and hopefully end up with a mostly straight piece of lumber. If you are using treated lumber for bucks, buy it as far in advance as possible and stack it with slats between it to allow it to dry. The moisture content is really high on fresh treated lumber and it will shrink a bit as the moisture escapes. |
|
|
|
|
arkie6
Veteran Member
Posts:1453
|
| 14 Apr 2011 02:18 PM |
|
I'm still working on my basement. When I do the main floor, I may try a variation of the last method shown above, except for the internal part of the buck, use a 2x4 ripped in half on a 45 degree angle. The 2x4s @ 45 deg would be installed such that the concrete locks the buck to the wall.
|
|
|
|
|
natjwest
New Member
Posts:42
|
| 14 Apr 2011 02:25 PM |
|
Posted By arkie6 on 14 Apr 2011 02:18 PM
I'm still working on my basement. When I do the main floor, I may try a variation of the last method shown above, except for the internal part of the buck, use a 2x4 ripped in half on a 45 degree angle. The 2x4s @ 45 deg would be installed such that the concrete locks the buck to the wall.
That's a novel approach I hadn't heard arkie. Are there reports of bucks anchored in the concrete with screws becoming dislodged to warrant such a procedure?
And why would you use that 45 deg ripping procedure for above-grade but not in the basement? I'm only doing a basement. |
|
|
|
|
natjwest
New Member
Posts:42
|
| 14 Apr 2011 02:29 PM |
|
Posted By arkie6 on 14 Apr 2011 01:55 PM
If you are using treated lumber for bucks, buy it as far in advance as possible and stack it with slats between it to allow it to dry. The moisture content is really high on fresh treated lumber and it will shrink a bit as the moisture escapes.
I heard some advice from an ICF contractor related to this topic. He special-orders 3x12 PT lumber for his bucks to control the warping while drying. 3x12s cannot be very cheap compared to something potentially more labor intensive (but material cheap) like option #1. |
|
|
|
|
Alton
Veteran Member
Posts:2164
|
| 14 Apr 2011 03:16 PM |
|
I think that I would much prefer to use fiberglass instead of treated wood for the bucks. I think fiberglass is more stable than wood or vinyl. |
|
Residential Designer &
Construction Technology Consultant -- E-mail: Alton at Auburn dot Edu Use email format with @ and period .
334 826-3979 |
|
|
natjwest
New Member
Posts:42
|
| 14 Apr 2011 04:05 PM |
|
Do you mean dimensional fiberglass? Or something pre-made for ICF bucks? Thanks for the idea. |
|
|
|
|
Alton
Veteran Member
Posts:2164
|
| 14 Apr 2011 05:28 PM |
|
I was referring to pultruded structural fiberglass composite C-channels that are stronger than steel and lighter than wood and dimensionally stable. |
|
Residential Designer &
Construction Technology Consultant -- E-mail: Alton at Auburn dot Edu Use email format with @ and period .
334 826-3979 |
|
|
arkie6
Veteran Member
Posts:1453
|
| 14 Apr 2011 06:08 PM |
|
Posted By natjwest on 14 Apr 2011 02:25 PM
Posted By arkie6 on 14 Apr 2011 02:18 PM
I'm still working on my basement. When I do the main floor, I may try a variation of the last method shown above, except for the internal part of the buck, use a 2x4 ripped in half on a 45 degree angle. The 2x4s @ 45 deg would be installed such that the concrete locks the buck to the wall.
That's a novel approach I hadn't heard arkie. Are there reports of bucks anchored in the concrete with screws becoming dislodged to warrant such a procedure?
And why would you use that 45 deg ripping procedure for above-grade but not in the basement? I'm only doing a basement.
No particular reason for not using that method on the basement. This is my first DIY ICF build and was following the instructions in the manual. Someone on here mentioned the method I discussed above and after building my current window bucks, I think it is a good idea. Part of the problem with large treated 2x lumber is dimensional stability. It tends to cup. Using 3/4" treated plywood helps alleviate this somewhat. Below is a sketch of what I'm considering for the main floor window and door bucks. I would still attach the window buck to the ICF foam using the 3-1/2" screws and large plastic EIFS washers.  |
|
|
|
|
natjwest
New Member
Posts:42
|
| 14 Apr 2011 06:36 PM |
|
Thanks for sharing this drawing arkie. Another benefit of your design is the much lower cost of PT 2x4 over larger sizes of lumber. |
|
|
|
|
BrucePolycrete

Advanced Member
Posts:524
|
| 15 Apr 2011 06:26 AM |
|
Looks like a lot of extra work. |
|
|
|
|
ICFBdr

Basic Member
Posts:238
|
| 18 Apr 2011 08:43 PM |
|
I like the idea of the angle cuts - I have seen it and some people seem to live by that detail (although I admit I have never tried it myself).
Personally, I like the 2x12 (or rip-cut, etc.) to extend the full thickness of the form. This provides solid attachment points inside and out. One important detail I follow, is to use nails/screws to mechanically fasten the bucks to the concrete (as arkie6 shows), as well as a layer of sill sealer (some people call it sill gasket) around the outside of the 2x12. This gets sandwiched between the wood and the concrete and if the concrete pulls away from the bucks as it cures and shrinks, then this sill gasket/sealer fills in the void, stopping any air/moisture issues. Very cheap and easy to do (and effective).
One word of caution - you may run into issues with a detail like #1, since your window is not fastened directly to a solid substrate. Be sure to check with window manufacturer, as this may void any warranty. Also may cause issues with Fire Inspector - in a fire, there is nothing to stop the flame from spreading around the window (ie, solid layer of EPS can melt and leave an open channel from fire to burn in from outside building). |
|
|
|
|
natjwest
New Member
Posts:42
|
| 18 Apr 2011 10:32 PM |
|
Posted By ICFBdr on 18 Apr 2011 08:43 PM
One word of caution - you may run into issues with a detail like #1, since your window is not fastened directly to a solid substrate.
I had presumed that I would fasten through the foam into the lumber underneath with, say, 3" screws. |
|
|
|
|
ICFBdr
Basic Member
Posts:238
|
| 19 Apr 2011 01:26 PM |
|
That is typically how it is done - however, the problem arises since it is not fastened DIRECTLY to the solid substrate (ie, there is EPS between the window and the wood). Structurally I don't think this method would ever fail. However, it may void your window warranty if any problems do arise. Your best bet would be to check with your window supplier regarding their warranty policies and recommended installation methods. |
|
|
|
|
irnivek
Basic Member
Posts:229
|
| 19 Apr 2011 11:47 PM |
|
Can use timberstrand full width of block instead of 2 by lumber. Spray with water seal or cover the back side. Holds up great during and after the pour.
Problem is you end up having happy trim guys, happy drywall guys, happy window installers, happy siders. Everyone ends up so happy the GC thinks they are paying too much, and the GC gets grumpy. All because of window and door bucks that make sense.
Gotta love your neighbour, or at least the one who follows your work!
|
|
|
|
|